Getting started
Configure GitHub SSH key
For GitHub to be able to SSH into the servers and copy the built project, we need to configure a new SSH key.
Note: you only need to do this once for the repository.
Run the ssh-keygen command locally in the root of the project:
mkdir -p resources/server/deploy/ssh/ && \
ssh-keygen -t ed25519 -C "GitHub SSH" -f resources/server/deploy/ssh/github_ssh_key -N ""
Next, copy the contents of the private key (github_ssh_key). On macOS:
cat resources/server/deploy/ssh/github_ssh_key | pbcopyOn other systems, open the file and copy its contents manually.
Then go the repository settings, click "Secrets and variables", then "Actions", and finally on the green "New repository secret" button. Name the key DEPLOYER_SSH_KEY and paste the contents of the private key in the value field.
Finally, delete the private key so only the public key remains. This public key is automatically added to the deployer user on the remote servers during provisioning.
rm -f resources/server/deploy/ssh/github_ssh_keyCreate Cloudflare private tunnels
A Cloudflare Tunnel acts as a secure, isolated connection between the private Digital Ocean droplets and a load balancer. This ensures the DO servers remain absolutely inaccessible to any direct public traffic (unless you obtain its IP), and are always protected by Cloudflare's multiple secure firewalls and best practices.
Cloudflare treats a single tunnel used on multiple hosts as a single endpoint/host, so to use it in a load balancer setup where the load balancer is in charge of traffic steering you will need to create a tunnel for each server:
- Navigate to the Zero Trust dashboard
- Create a new team and sign up for the free plan if you're doing this for the first time
- Go to Networks > Tunnels and click "Add a tunnel"
- Select "Cloudflared" as connector type
- Give the tunnel the same name as your server node (e.g.
smarthealth-app-production-worker-ams3-1) - Save the token in your password manager. You'll need it when you provision the server(s). Take note of the tunnel ID (available in the overview) too, it'll be needed when setting up the load balancer.
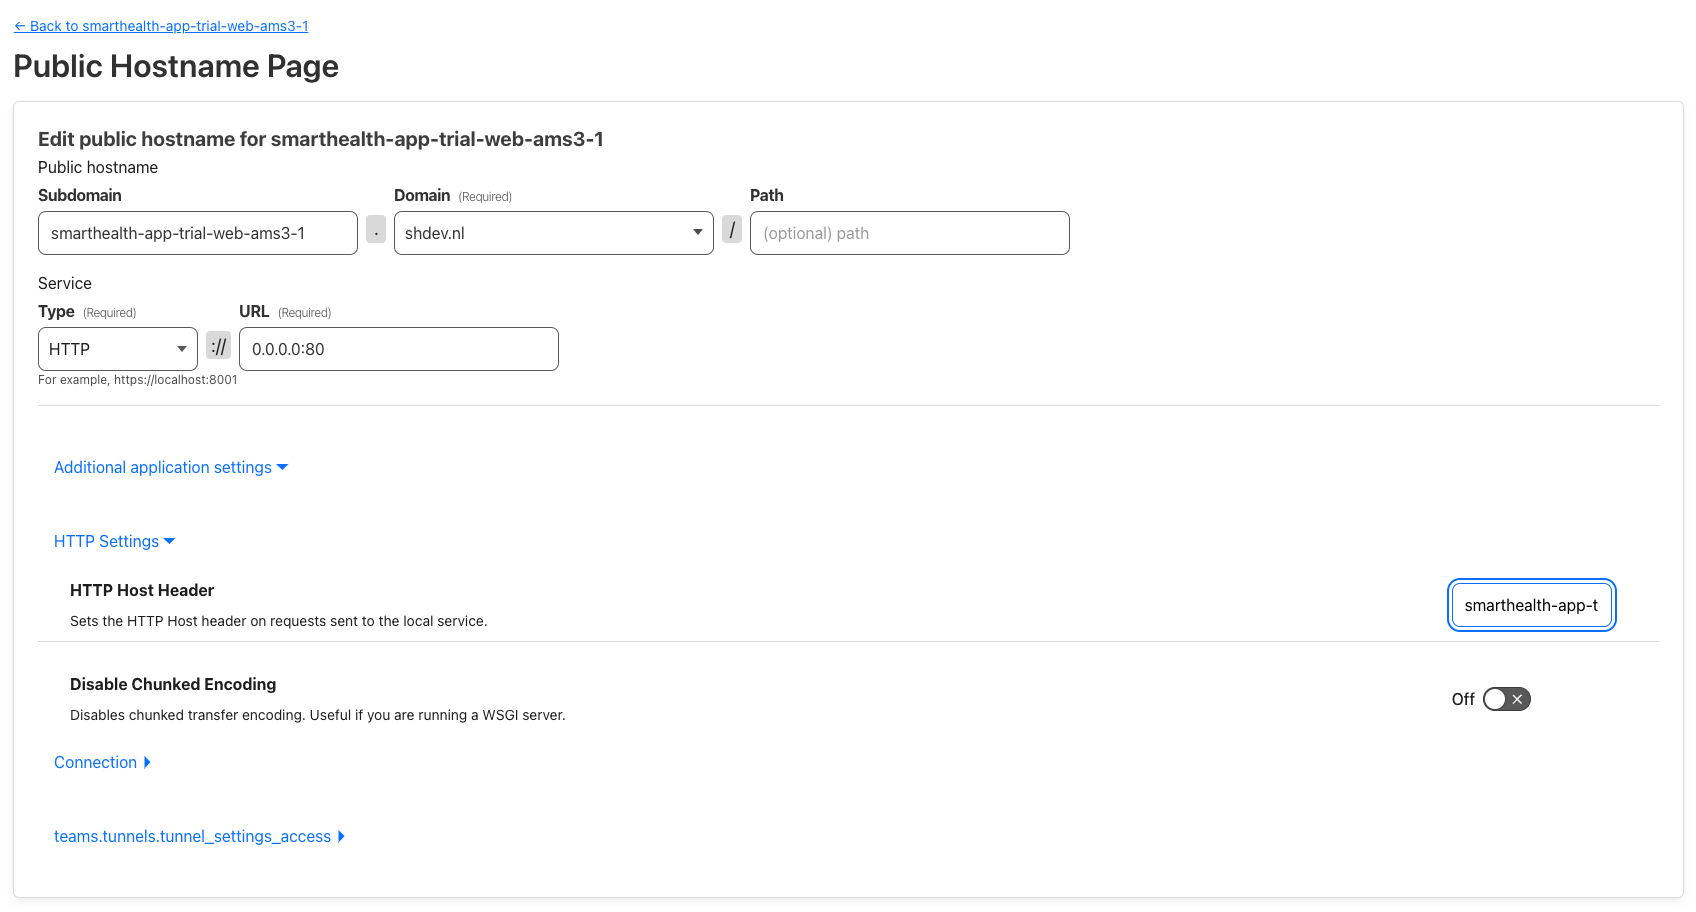
- Click "Next" and configure the public hostname we need for the load balancer routing (you can skip this for the worker servers):
- Subdomain: server node name (e.g.
smarthealth-app-production-worker-ams3-1) - Domain:
smarthealth.works(or e.g.smarthealth-app-trial.shdev.nlfor test environments) - Service:
http://0.0.0.0:80(at the end of the tunnel, on the node itself, this should route to the Caddy Docker container) - Under "Additional application settings", then "HTTP Settings", set "HTTP Host Header" to the main domain (
smarthealth.worksor e.g.smarthealth-app-trial.shdev.nl). This ensures the main domain is preserved when the load balancer reroutes via the tunnel.
- Subdomain: server node name (e.g.
- Under DNS > Records, you can delete the CNAME record for this public hostname since we don't need it to be public for the load balancer
Note: if you get "Error getting DNS record" when you later edit the public hostname, create a temporary CNAME DNS record and delete it after saving:
- Type: CNAME
- Name:
smarthealth-app-production-worker-ams3-1or other (the previous name) - Target:
TUNNELID.cfargotunnel.com
Tunnel public hostname configuration:
References:
- https://developers.cloudflare.com/cloudflare-one/connections/connect-networks
- https://nyan.im/p/cloudflare-load-balancer-tunnel#Load_Balancer_and_Origin_Pool
Create a private network
Note: you can skip this step and use the default VPC for the datacenter if you don't want to isolate the servers.
On DigitalOcean, create a new VPC network for each region and datacenter you want to create servers in:
- Select the region
- Name it
smarthealth-app-production-vpc-ams3(according to chosen region)
Create the servers
Go to the DigitalOcean Droplet control panel and click "Create Droplet", then:
- Choose the region and datacenter (try to distribute them evenly)
- Assign to the
smarthealth-app-production-vpc-ams3network (depending on region) - OS: Ubuntu 24.04 LTS (or newer) image
- Droplet type: shared CPU (Basic), premium AMD, NVMe SSD, 2GB memory (at least, for Docker)
- If you're creating a worker server, you might want to choose 4GB memory
- Configure SSH keys for server owner and server manager(s)
- Enable improved metrics monitoring and alerting
- Name it like
smarthealth-app-production-web-ams3-1orsmarthealth-app-production-worker-ams3-1(based on environment and datacenter) - Optionally add some tags like
smarthealth,smarthealth-app,smarthealth-app-production,smarthealth-app-production-web/smarthealth-app-production-worker
Repeat these steps for every server you want to create in the cluster.
Configure the network firewall
When configuring Docker containers to use the host network or publishing ports, Docker uses Ubuntu's iptables firewall to open up these ports. This means private services are publicly exposed. You usually use ufw (uncomplicated firewall) to configure a server firewall, but this uses iptables under the hood too which Docker overrides. The only alternatives are using iptables (complicated) or DigitalOcean's network firewall, which works outside the server and can be assigned to many at once.
Let's configure DigitalOcean's firewall (only once, for all environments):
- Go to the "Create Firewall" page
- Enter
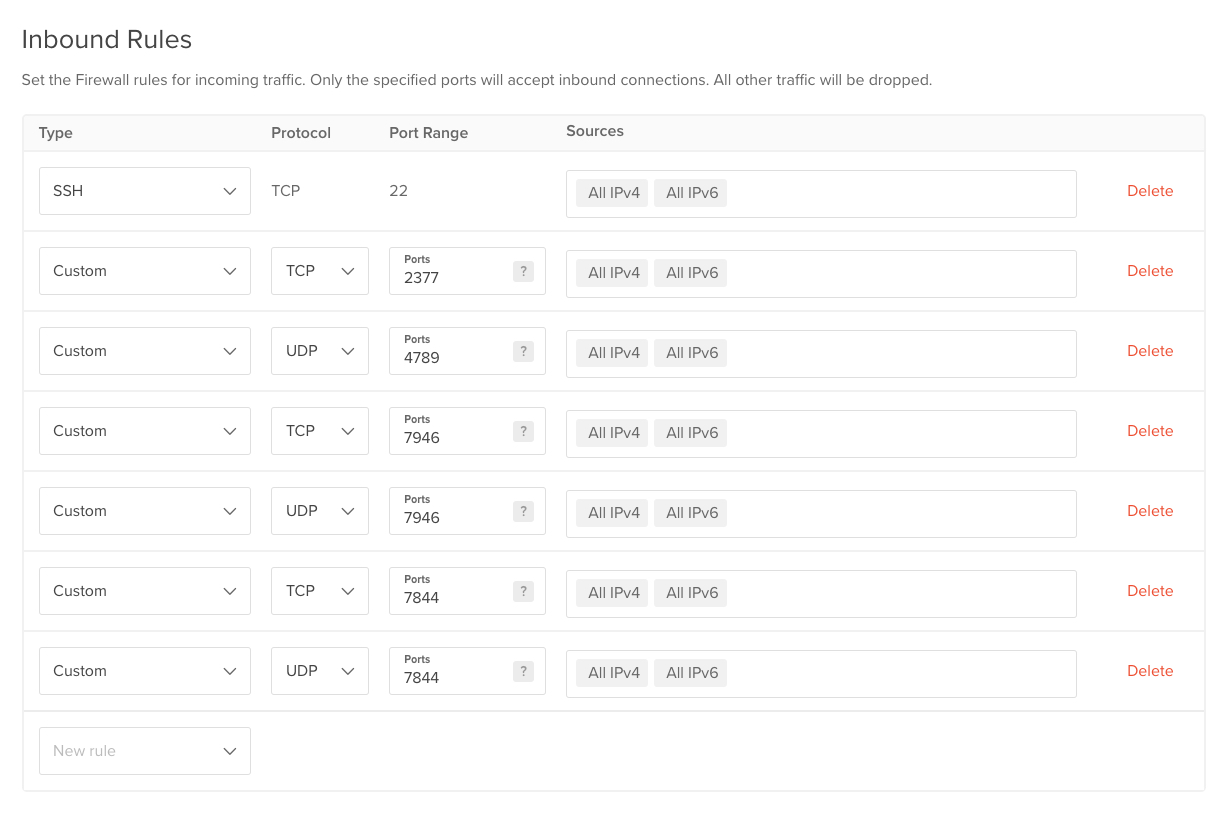
smarthealth-appas name - Under "Inbound Rules", configure:
- SSH TCP 22
- Custom TCP 2377 (Docker swarm — communication with and between manager nodes)
- Custom UDP 4789 (Docker swarm — overlay network traffic)
- Custom TCP 7844 (Cloudflare Tunnel)
- Custom UDP 7844 (Cloudflare Tunnel)
- Custom TCP 7946 (Docker swarm - overlay network node discovery)
- Custom UDP 7946 (Docker swarm - overlay network node discovery)
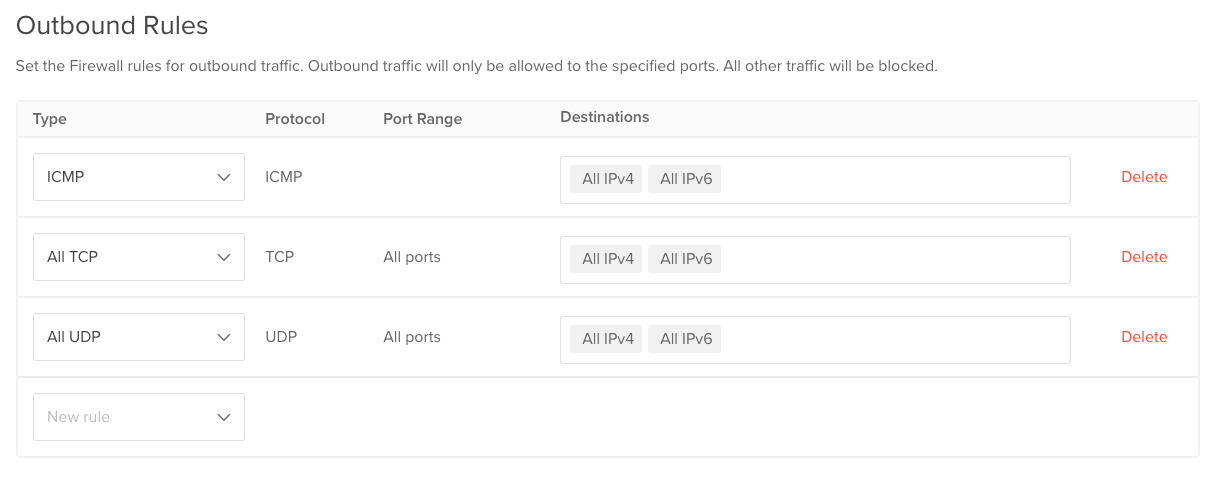
- Under "Outbound Rules", leave the defaults:
- ICMP ICMP
- All TCP TCP All ports
- All UDP UDP All ports
- Under "Apply to Droplets", type and select the
smarthealth-apptag to apply it to all app servers

Create a managed MySQL database
- On the managed databases page, click "Create Database"
- Select the region (
AMS3) - Select the VPC network you created earlier (
smarthealth-app-production-vpc-ams3) - Choose "MySQL (v8)"
- Under "Basic - Shared CPU", select "Premium AMD" and "1vCPU / 1GB RAM"
- Set storage size to "20GB" (or however large the database is)
- Give it a fitting name (
smarthealth-app-production-mysql-ams3-1) - Add some tags like
smarthealth,smarthealth-app,smarthealth-app-production,smarthealth-app-production-database,smarthealth-app-production-database-mysql
Wait until the cluster has been created, then move on to securing it:
- Go to the cluster's "Settings" tab
- Scroll down to "Trusted sources" and click "Edit"
- Type in
smarthealth-app-productionand select the corresponding tag to add all current and future production servers - Click "Save"
Note: this prevents access to anyone and any server except for the tagged environment. To connect to it from your own machine, enable connecting to the server via SSH (in TablePlus called "Over SSH"), then to the database.
Next, we have to configure the databases:
- Go to the cluster's "Users & Databases" tab
- Create a database called
smarthealth
And continue with configuring the database users:
- Create a main
20240718_smarthealthuser with the "Default - MySQL 8+" password encryption and write down the password
Repeat this for each user you want to create (e.g. dedicated accounts for developers).
Note: prefixing the usernames with a date, i.e. 20240718_sebastiaan, allows you to rotate accounts if a password was leaked.
Finally, configure some additional settings:
- Go to the cluster's "Settings" tab
- Scroll down to "Upgrade window" and click "Edit"
- Select a time the app doesn't have many visitors and there are few scheduled jobs (e.g. Sunday at 3AM)
- Click "Save"
Create a managed Redis database
- On the managed databases page, click "Create Database"
- Select the region (
AMS3) - Select the VPC network you created earlier (
smarthealth-app-production-vpc-ams3) - Choose "Redis (v7)"
- Under "Basic - Shared CPU", select "1vCPU / 1GB RAM"
- Give it a fitting name (
smarthealth-app-production-redis-ams3-1) - Add some tags like
smarthealth,smarthealth-app,smarthealth-app-production,smarthealth-app-production-database,smarthealth-app-production-database-redis
Wait until the cluster has been created, then move on to securing it:
- Go to the cluster's "Settings" tab
- Scroll down to "Trusted sources" and click "Edit"
- Type in
smarthealth-app-productionand select the corresponding tag to add all current and future production servers - Click "Save"
Note: this prevents access to anyone and any server except for the tagged environment. To connect to it from your own machine, enable connecting to the server via SSH (in TablePlus called "Over SSH"), then to the database. Additionally, for Redis, set "SSL mode" to SSL_VERIFY_NONE.
After, configure some additional settings:
- Go to the cluster's "Settings" tab
- Scroll down to "Upgrade window" and click "Edit". Select a time the app doesn't have many visitors and there are few scheduled jobs (e.g. Sunday at 3AM) and save.
- Click "Edit" next to the "Eviction Policy" and choose the recommended "
allkeys-lruEvict any key, least recently used (LRU) first" policy and save.
Provision the servers
Add the newly created servers to resources/server/deploy/config/hosts.php and configure their IPs in .env.deployer. Make sure to update the ENV_DEPLOYER secret on GitHub under Settings > Environments > environment > Environment secrets too! See the SH project assets folder for the example structure.
Then in your password manager, create 2 passwords for the smarthealth and deployer server users for this environment.
Execute the provisioning script from your own local machine:
DANGER
Make sure you're provisioning the correct environment
dep app:provision env=production -o remote_user=rootEnter the passwords for the users when asked.
Note: if the deployment fails and gets stuck locked, run dep deploy:unlock env=production -o remote_user=root to unlock it.
Configure Docker
Run this command locally to configure Docker, and create and configure a swarm cluster:
DANGER
Make sure you're setting up the correct environment
dep app:docker env=productionThe command can be run multiple times to add new nodes to an existing swarm or to rebuild the PHP Docker image.
Each cluster of worker or manager nodes needs at least one manager that's also the leader. A swarm always needs an odd number of managers (including one leader), with a minimum of 3, to ensure high availability when a manager server goes down. Don't create more than ~6 managers in total because you'll lose some benefits. This setup does not handle creating individual worker servers, only managers.
Environment secrets
The GitHub deployment action requires a few secrets to run.
Go to Settings > Environments > production (or other) > Environment secrets to manage them for the relevant environment.
ENV(seeassets/env/.env.examplein the app repository): holds all runtime application environment variablesENV_DEPLOYER(seeassets/env/.env.deployerin the app repository): environment variables necessary for the deployment itself via DeployerSLACK_WEBHOOK_URL: the Slack channel webhook URL for this environment
Under repository secrets, configure these:
SENTRY_AUTH_TOKEN: the Sentry authentication token for the Sentry GitHub action (see https://github.com/marketplace/actions/sentry-release)
Set up a Cloudflare load balancer
While Docker swarm ensures the health of all services and routes internally if one replica goes down, Cloudlfare's load balancer ensures that the application can actually be reached and responds correctly by rerouting on a higher level.
- Go to Traffic > Load Balancing and click "Create Load Balancer"
- Enter the domain that you'd like to use (e.g.
smarthealth-app-local.shdev.nlfor a test subdomain orsmarthealth.worksfor production) - Enable "Failover across pools" under "Adaptive Routing" and click "Next"
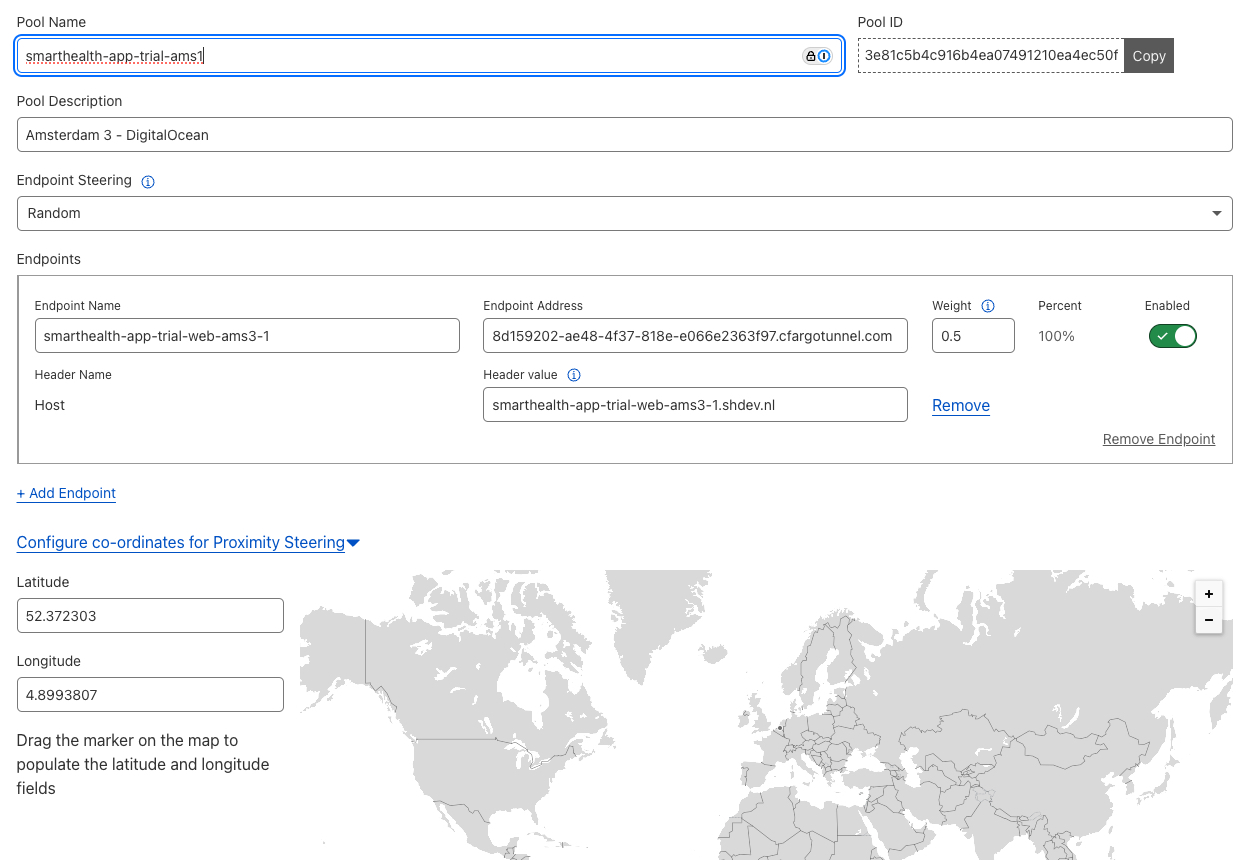
- Click "Create a pool" to configure the first cluster
- Pool name:
smarthealth-app-production-ams - Description:
DigitalOcean - Amsterdam 3 - Endpoint Steering: Random
- Endpoints (repeat for each server in this geographical cluster):
- Endpoint Name:
smarthealth-app-production-web-ams3-1 - Endpoint Address:
TUNNELID.cfargotunnel.com(you can get the tunnel ID from Account > Zero Trust > Networks > Tunnels) - Weight:
0.5(= 1 / amount of web servers) - "Host" header:
smarthealth-app-production-web-ams3-1.smarthealth.worksorsmarthealth-app-local-web-1.shdev.nl(the public hostname you assigned to the tunnel you're routing to)
- Endpoint Name:
- Proximity Steering (define the region where the servers are located) under "Configure co-ordinates for Proximity Steering":
- Latitude:
52.3 - Longitude:
5.16
- Latitude:
- Select the existing health monitor or leave empty (you can configure it in the next step)
- Health Check Regions: Western Europe
- Pool name:
- In the next step, click "Attach monitor" and then "Create a Monitor" (optional, if you haven't already created and selected one)
- Name:
Default - Follow Redirects: ✓ / yes
- Header:
Hostwith valueapp.smarthealth.works - Save and enter the email address of the person to notify if the pool should become unhealthy
- Name:
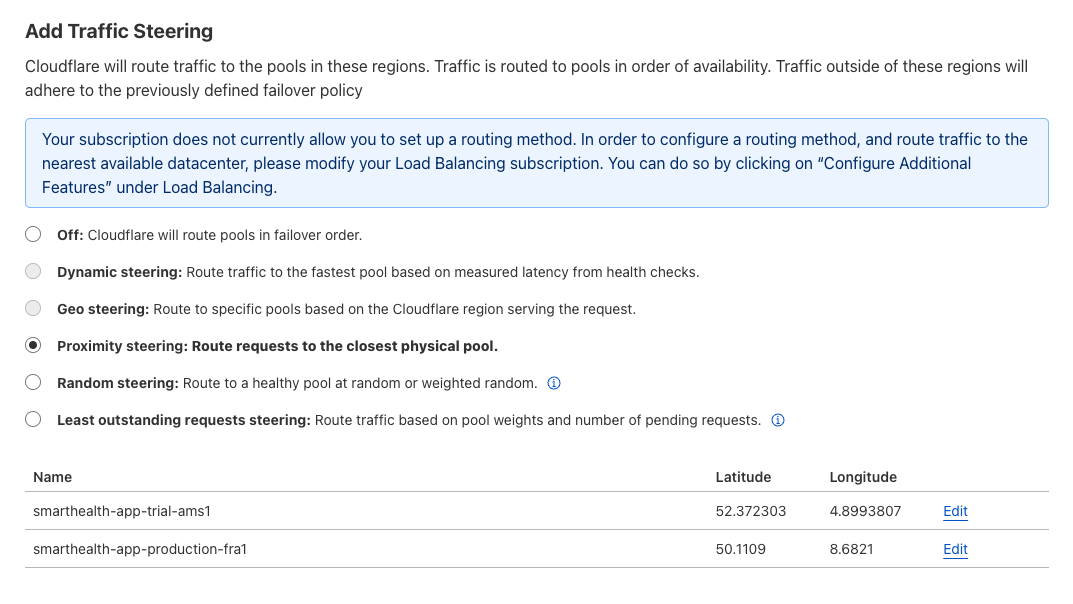
- On the "Traffic Steering" tab, choose "Off". Alternatively you can select "Proximity steering: Route requests to the closest physical pool" if the current subscription supports it and you want to serve users from the closest data center (note that this will still incur some latency because of the location of the database).
- Click through the next steps and finally "Save and Deploy"
To add another geographical cluster of servers (or just one): in the load balancer overview, click "Edit" and "+ Create a pool", then repeat the steps above.
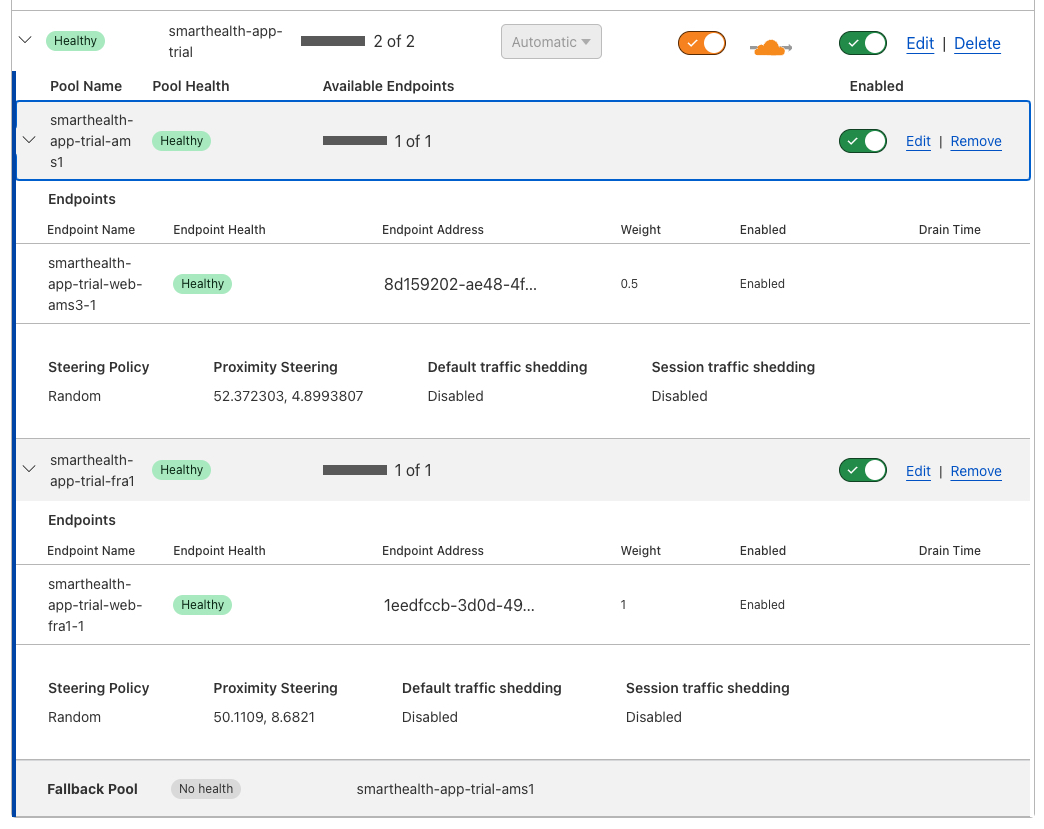
Load balancer pool endpoints configuration:
Traffic steering:
Overview:
References:
- https://developers.cloudflare.com/cloudflare-one/connections/connect-networks/deploy-tunnels/deploy-cloudflared-replicas/#cloudflare-load-balancers
- https://developers.cloudflare.com/cloudflare-one/connections/connect-networks/routing-to-tunnel/lb
Next steps
After this initial setup, configure the GitHub environment secrets and run the deployment workflow in GitHub to deploy it to all servers.