AFAS
AFAS is a Dutch software company that many of our clients use for their payroll and HR administration. Being a certified partner means that we can get employee and other data of (future) Smart Health clients via the AFAS API.
Connectors
An AFAS GET connector is basically a pluggable data mapper that tells AFAS which fields we want and translates those to our structure. It's a type of connector used in the AFAS Profit software to retrieve data from its database. It enables external applications to request and receive data stored in AFAS Profit by defining specific endpoints. These endpoints are configured to extract records from certain tables within the AFAS SQL database, allowing for precise data retrieval based on the defined fields and relationships within the database.
Overview
In short, these are the steps involved to retrieve data from a client's AFAS account:
- We build an AFAS GET connector (once)
- A client installs our GET connector via the AFAS platform into their own environment
- We use that GET connector to fetch the client's data and import it into our application
Creating a new connector
Setting up a demo environment
Before we can build, test, and export any connectors, we need to set up a (demo) environment to create them in. Such an environment is called "AFAS Profit".
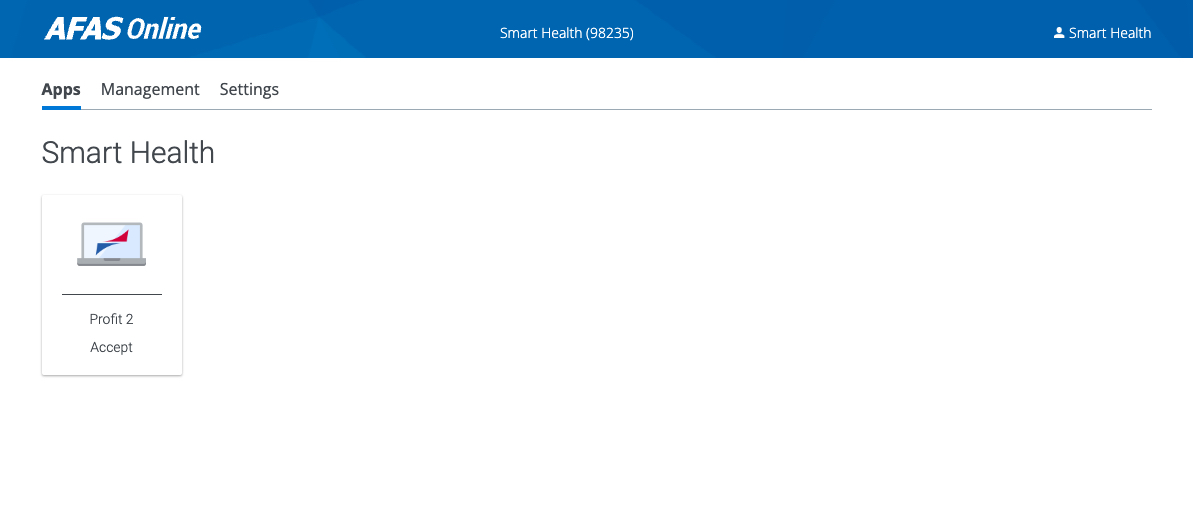
- Log in to the existing AFAS Profit environment via AFAS Online (this doesn't use the same account as other AFAS logins)
- Click on the tile that corresponds with the Smart Health account. In this case "Profit 2" under "Smart Health".
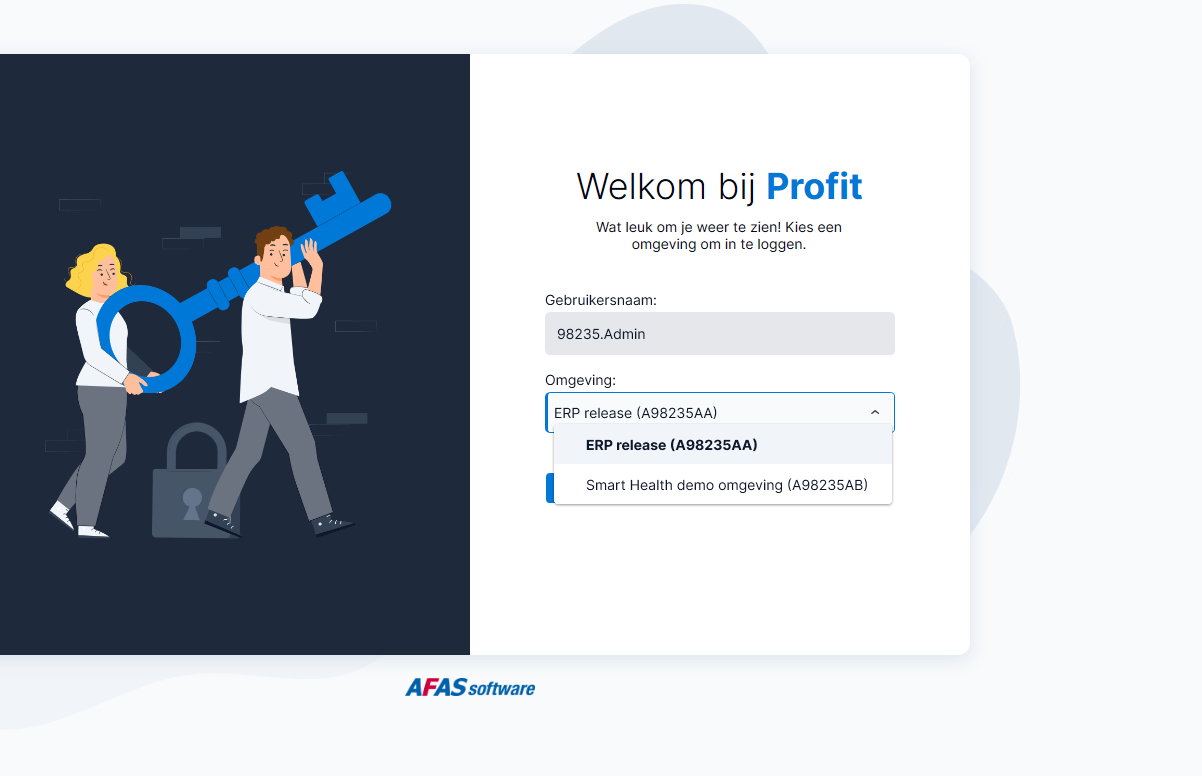
- Select the "ERP release (A98…)" environment and click "Inloggen"
- Click "Algemeen" in the sidebar
- Under "Omgeving", select "Beheer" then "Aanvragen omgeving"
- Click the "Acties" button, then "Nieuwe aanvraag"
- Click the search button next to the "Actie" input field and double click "Nieuwe demo-omgevingmaken (06)"
- Click the search button next to the "Template" input field and double click any of the available environments
- Click "Voltooien" to submit the request
The request will take a few days for them to approve and complete. When done, you'll be notified via mail at development@smarthealth.works.
See https://help.afas.nl/help/NL/SE/App_AOL_Env_Copy.htm for more information.
Step 2: logging in
Step 3: selecting the environment
Step 7: demo environment
Logging in to the demo environment
If you're still logged in to the current default environment, click the "x" button in the top right to log out.
- Log in to the existing AFAS Profit environment via AFAS Online (this doesn't use the same account as other AFAS logins)
- Click on the tile that corresponds with the Smart Health account. In this case "Profit 2" under "Smart Health".
- Select the newly created "Smart Health demo omgeving (A98…)" and click "Inloggen"
- When you log in for the first time, it'll ask you to select an administration first. Choose "J&W".
Step 4: select an administration
Creating a new GET connector
- Click "Algemeen" in the sidebar
- Under "Uitvoer", select "Beheer" then "GetConnector"
- Click "Nieuw"
- Under "Op basis van" choose "Gegevensverzameling"
- Type "medewerker" in the "Definitie" input field and select "Medewerker (Actuele gegevens)" in the list
- In the next tab:
- Give the connector a globally unique name and version number:
smarthealth_employees_v1 - A description (that is used as a name):
All employees - And an extensive description under "Toelichting":
Provides a list of all employees for the Smart Health platform. Version 1 (2024-08-26).
- Give the connector a globally unique name and version number:
- Keep the rest of the fields as-is
- Eigeneer: Administratie
- Product: HRM
- Functiegroep: Medewerker
- Click "Volgende", then "Voltooien"
Configuring the employees GET connector
Next, we'll configure the data set and fields we can retrieve with the connector:
- Type in "smarthealth" in the input field under "Naam"
- Double-click the "smarthealth_employees_v1" connector you created earlier and click "Volgende"
- Click "Gegevens" at the top
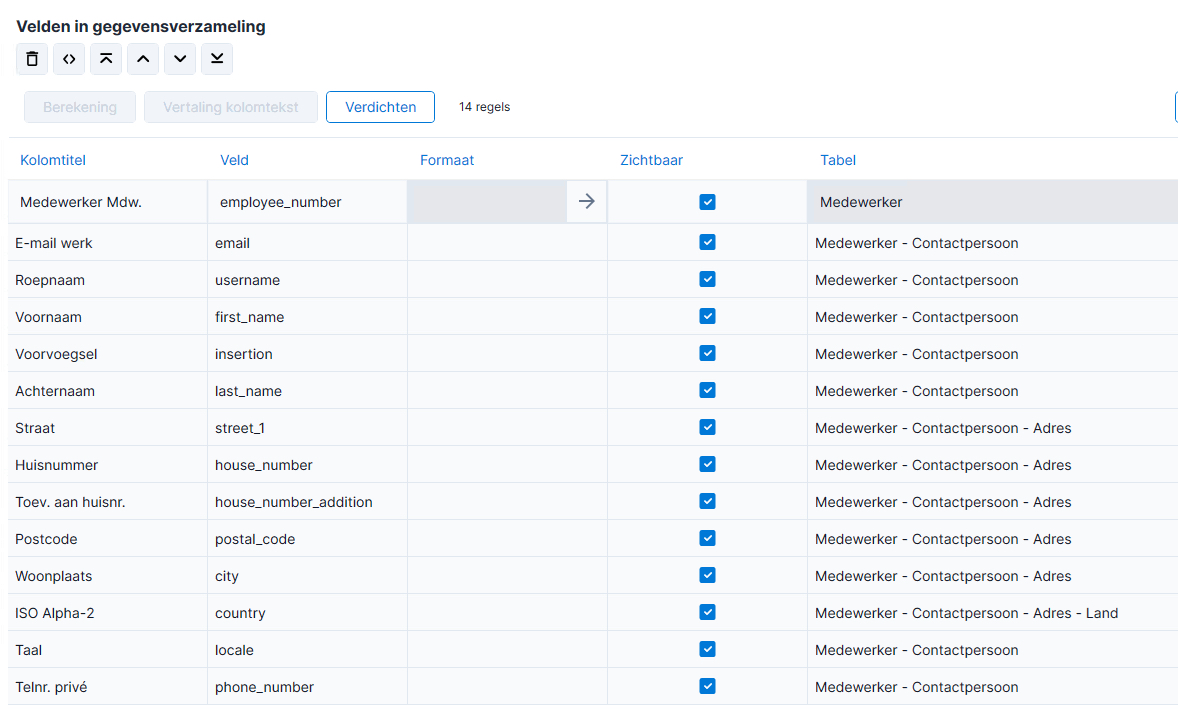
- Using the configurator, select the source fields we want
- Medewerker > Medewerker > Medewerker (drag the whole section)
- Medewerker > Medewerker > Persoon > Contactpersoon > E-mail werk
- Medewerker > Medewerker > Persoon > Contactpersoon > Roepnaam
- Medewerker > Medewerker > Persoon > Contactpersoon > Voornaam
- Medewerker > Medewerker > Persoon > Contactpersoon > Voorvoegsel
- Medewerker > Medewerker > Persoon > Contactpersoon > Achternaam
- Medewerker > Medewerker > Persoon > Contactpersoon > Adres > Adres > Straat
- Medewerker > Medewerker > Persoon > Contactpersoon > Adres > Adres > Huisnummer
- Medewerker > Medewerker > Persoon > Contactpersoon > Adres > Adres > Toev. aan huisnr.
- Medewerker > Medewerker > Persoon > Contactpersoon > Adres > Adres > Postcode
- Medewerker > Medewerker > Persoon > Contactpersoon > Adres > Adres > Woonplaats > Woonplaats
- Medewerker > Medewerker > Persoon > Contactpersoon > Adres > Adres > Woonplaats > Land > ISO Alpha-2
- Medewerker > Medewerker > Persoon > Contactpersoon > Titulatuur/correspondentie > Taal > Taal > Code ISO-taal code (drag the whole section)
- Medewerker > Medewerker > Persoon > Contactpersoon > Telefoonnr. privé
- Medewerker/contract > Dienstverband > Volgnummer dienstverband > Dienstverband > Einddatum
- Medewerker > Medewerker > Medewerker > Medewerker actuele gegevens > Organisatorische eenheid > Organisatorische eenheid
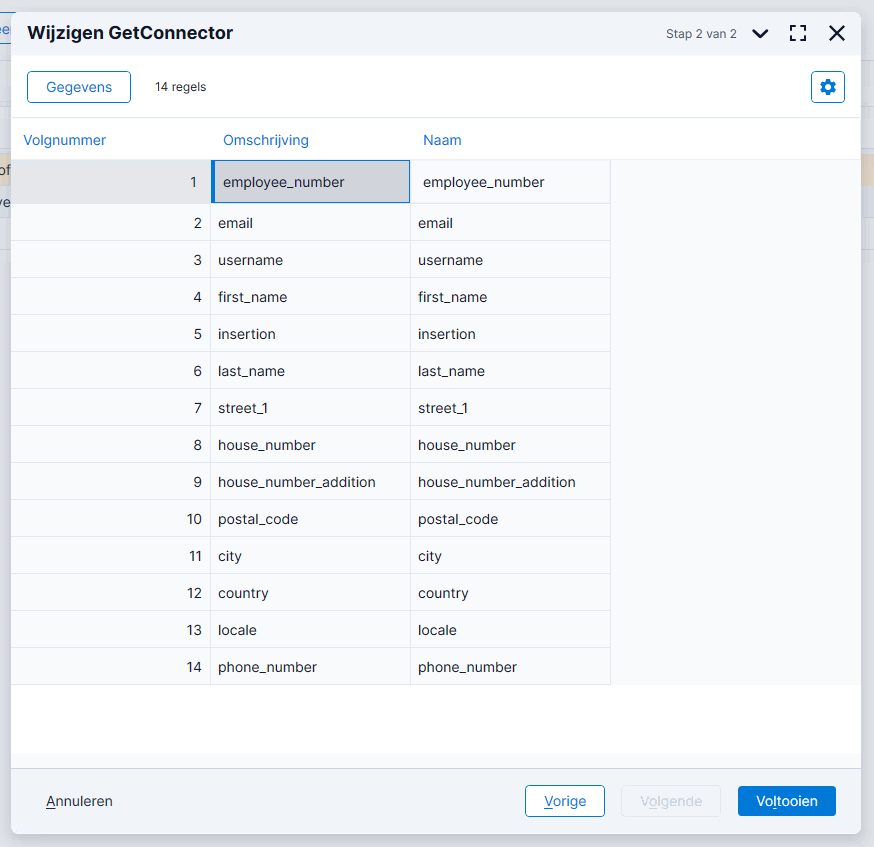
- Change the "Veld" value of each entry as follows (this is used in the AFAS Connect tool as "Field" value):
- Medewerker Mdw.:
employee_number - E-mail werk:
email - Roepnaam:
username - Voornaam:
first_name - Voorvoegsel:
insertion - Achternaam:
last_name - Straat:
street_1 - Huisnummer:
house_number - Toev. aan huisnr.:
house_number_addition - Postcode:
postal_code - Woonplaats:
city - ISO Alpha-2:
country - Code ISO-taal code:
locale - Telefoonnr. privé:
phone_number - Einddatum:
employment_end_date - Organisatorische eenheid:
organizational_unit_id
- Medewerker Mdw.:
- Give the data set a name, e.g. "smarthealth_employees_v1" and click "Voltooien"
- Back in the GET connector configuration modal, change the "Naam" of each field to match their source fields (these are used in the actual JSON response)
Step 5: configuring the source fields
Step 7: configuring the JSON fields
References:
- https://help.afas.nl/help/NL/SE/api.htm
- https://help.afas.nl/help/NL/SE/120718.htm
- https://docs.afas.help/profit/nl/GetConnector
Configuring the organizational units GET connector
Repeat Creating a new GET connector but start from the Profit_OrganizationChart.
Next, we'll configure the data set and fields we can retrieve with the connector:
- Type in "smarthealth" in the input field under "Naam"
- Double-click the "smarthealth_organizational_units_v1" connector you created earlier and click "Volgende"
- Click "Gegevens" at the top
- Using the configurator, remove the obsolete fields: actuele hoofdleidinggevende, laag
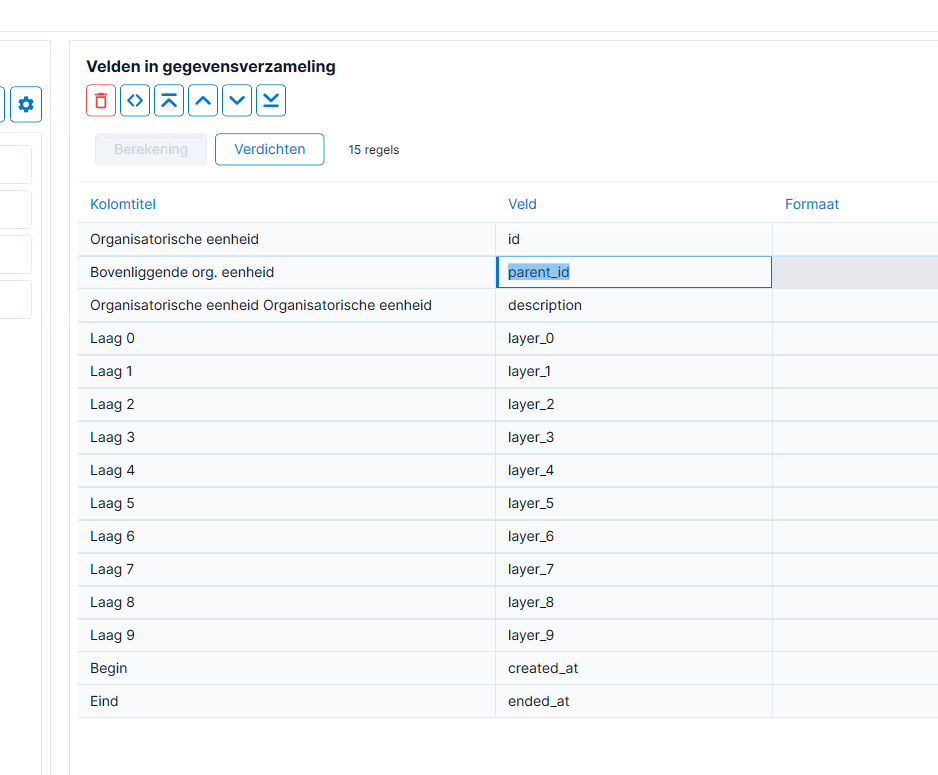
- Change the "Veld" value of each entry as follows (this is used in the AFAS Connect tool as "Field" value):
- Begin:
started_at - Eind:
ended_at - Organisatorische eenheid:
id - Organisatorische eenheid (omschrijving):
description - Bovenliggende org. eenheid:
parent_id - Laag 0:
layer_0 - Laag 1:
layer_1 - Laag 2:
layer_2 - Laag 3:
layer_3 - Laag 4:
layer_4 - Laag 5:
layer_5 - Laag 6:
layer_6 - Laag 7:
layer_7 - Laag 8:
layer_8 - Laag 9:
layer_9
- Begin:
- Give the data set a name, e.g. "smarthealth_organizational_units_v1" and click "Voltooien"
- Back in the GET connector configuration modal, change the "Naam" of each field to match their source fields (these are used in the actual JSON response)
Creating a token (app connector)
Next we'll need to create an "app connector" which is basically a fancy word and implementation for an authentication token (think OAuth2 Bearer token). You'll need an app connector and user group for each client that wants to use the connector. In our case we only need to follow the steps once to create a token to test the integration.
INFO
Ensure you're still logged in to the demo environment
- Click "Algemeen" in the sidebar
- Under "Beheer" select "App connector"
- Click the "Nieuw" button
- Enter a description, something like
smarthealth-app-test-1- Use the description known to external users of the app. When a user requests a token, they receive an email with a one-time password (OTP). The description of the app connector is also used in the subject of the email.
- Enable the "Automatisch token genereren" option
- Under "Gebruikersgroep", enable "Maak nieuwe gebruikersgroep op basis van App connector-naam"
- Click "Volgende", then "Nieuw"
- In the "Definitie" field type in the name of the GET connector you created and press ENTER
- Click the checkmark in front of the connector and click "Voltooien"
- Click "Volgende" and then "Voltooien" to create the app connector
- Save the token in your password manager
TIP
Best practice is to have one app connector per external application and one linked user group that's named after the application.
INFO
If you get an error saying "Er is iets fout gegaan bij het maken van de gebruikersgroep. Vul de gebruikersgroep handmatig in.", go back a few steps and pick a simpler name. Or choose "Gebruik bestaande gebruikersgroep", then click the button and select any user group.
References:
- https://help.afas.nl/help/NL/SE/api.htm
- https://help.afas.nl/help/NL/SE/120718.htm
- https://docs.afas.help/profit/nl/GetConnector
Testing a connector
- Go to https://connect.afas.nl/account and register (first time) or log in (note: this account is different from your main AFAS account)
- Navigate to the "REST/JSON" tab and click "GetConnectors"
- In the "AFAS Online member nr" enter the environment ID as numbers only, in this case
98235 - Select "Accept" as "Environment type"
- Select "Token authorization" as "Authentication type"
- And finally enter the full token you received in the previous step (
<token><version>1</version><data>71F4…</data></token>) - Click "Login with token"
- Under "GetConnector", select the GET connector you want to test
- Click "MetaInfo" to get details about the format or "Execute" to retrieve all demo employees in the given format
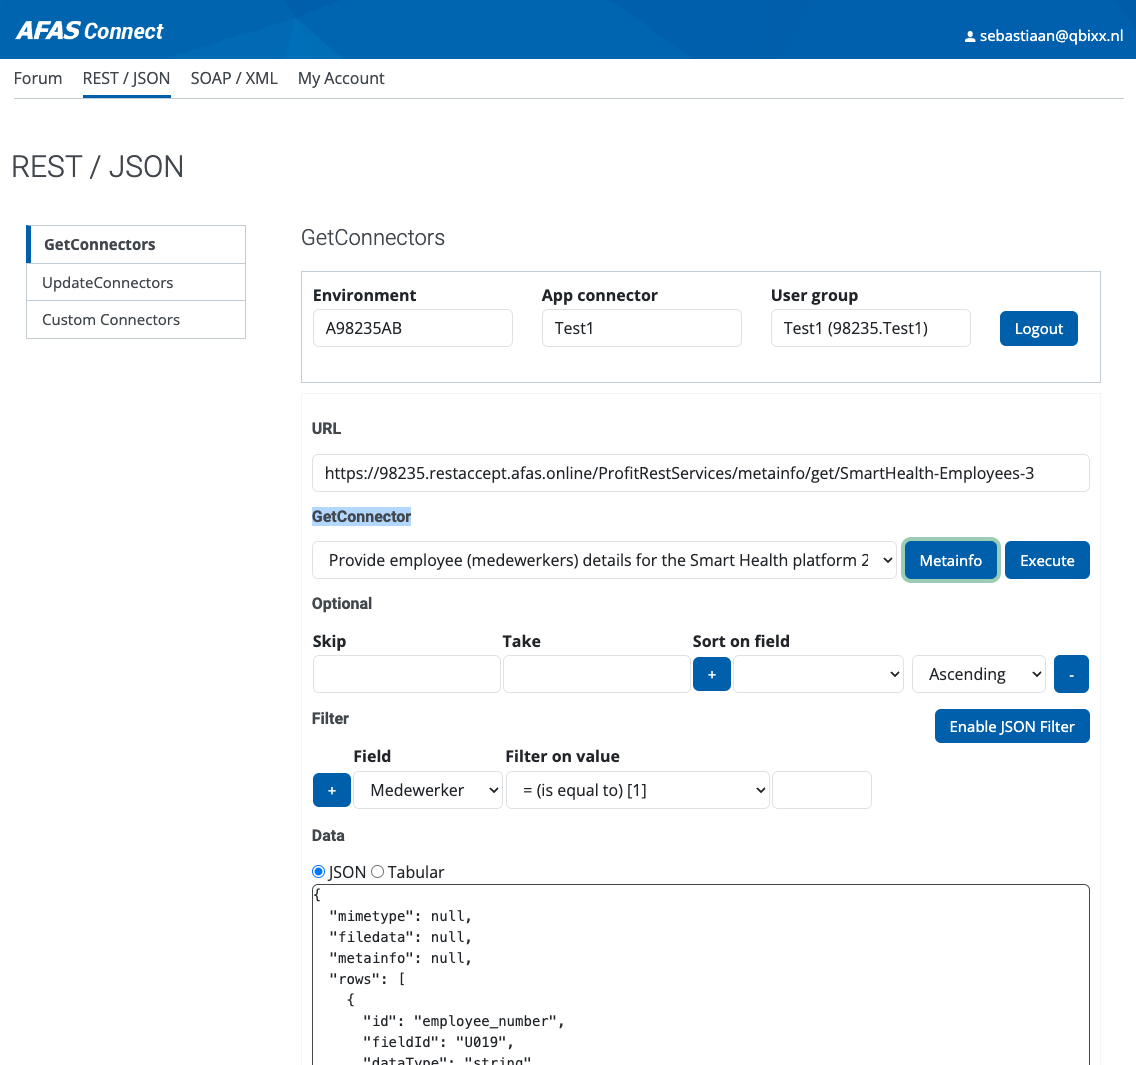
References:
https://help.afas.nl/help/NL/SE/cnr_cnct.htm
Testing a connector (externally)
To verify the connector is available from outside the AFAS ecosystem, call the API with the following structure:
TIP
The IntegrationId header is a requirement from AFAS to identify any requests coming from our platform.
GET https://98235.restaccept.afas.online/profitrestservices/connectors/smarthealth_employees_v1?take=5 HTTP/1.1
Content-Type: application/json
Accept: application/json
User-Agent: Smart Health - Local - user@qbixx.nl
Authorization: AfasToken base64encoded_app_connector_token
IntegrationId: 98235_217146
Connection: close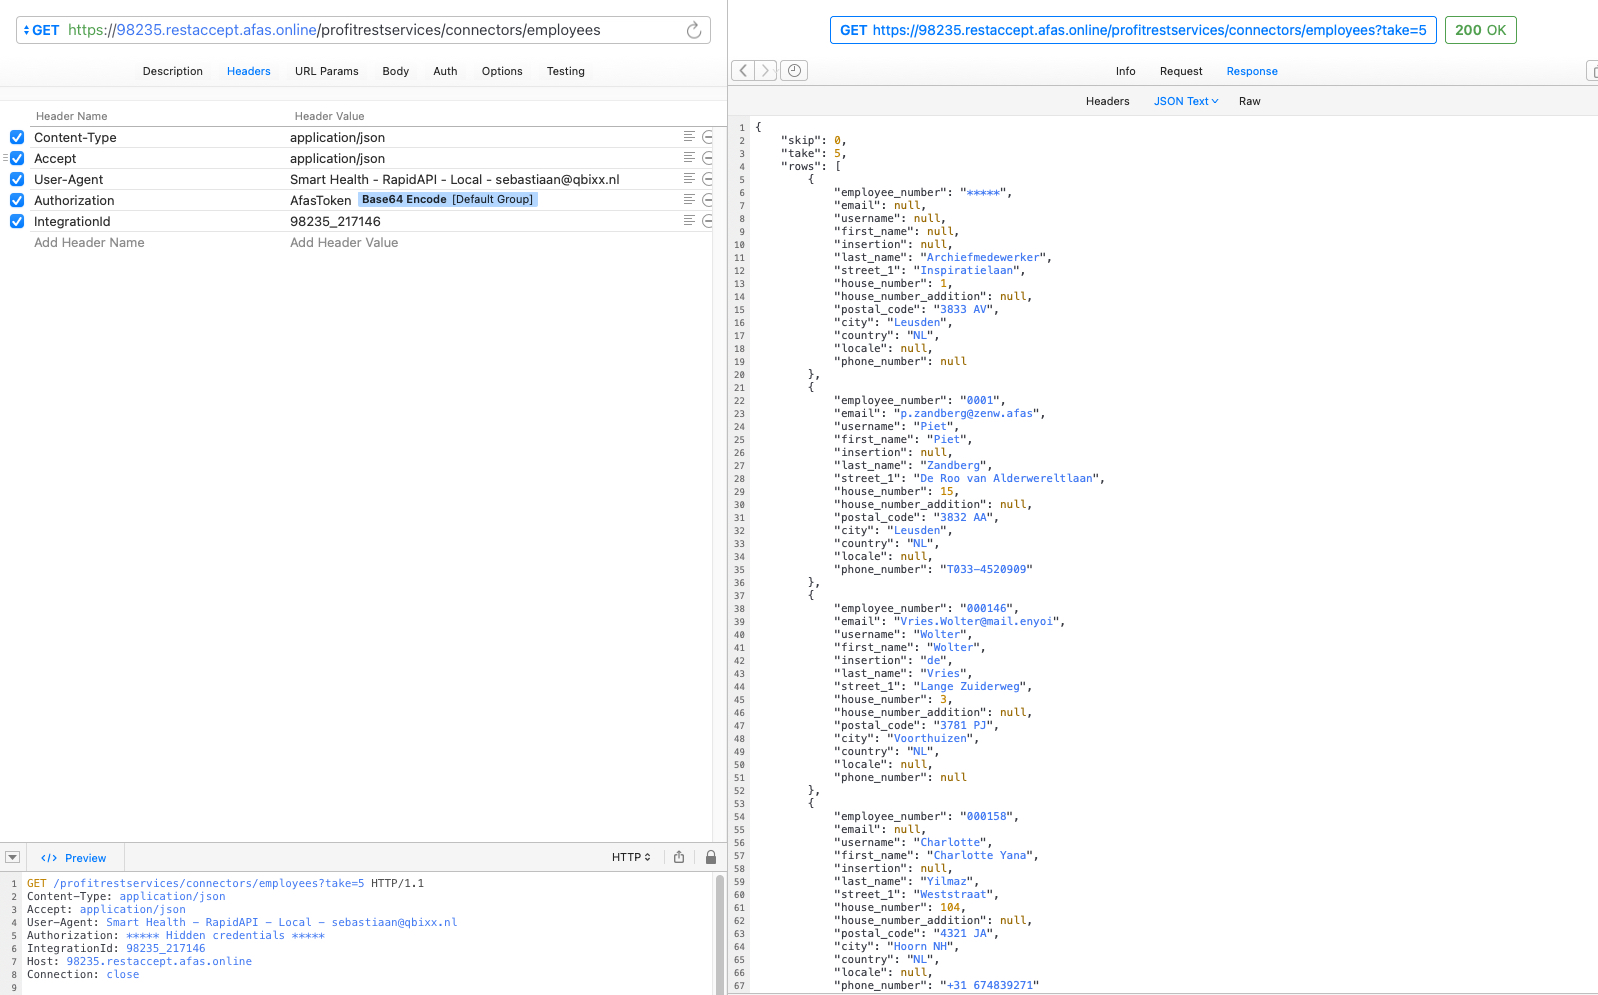
Exporting a connector
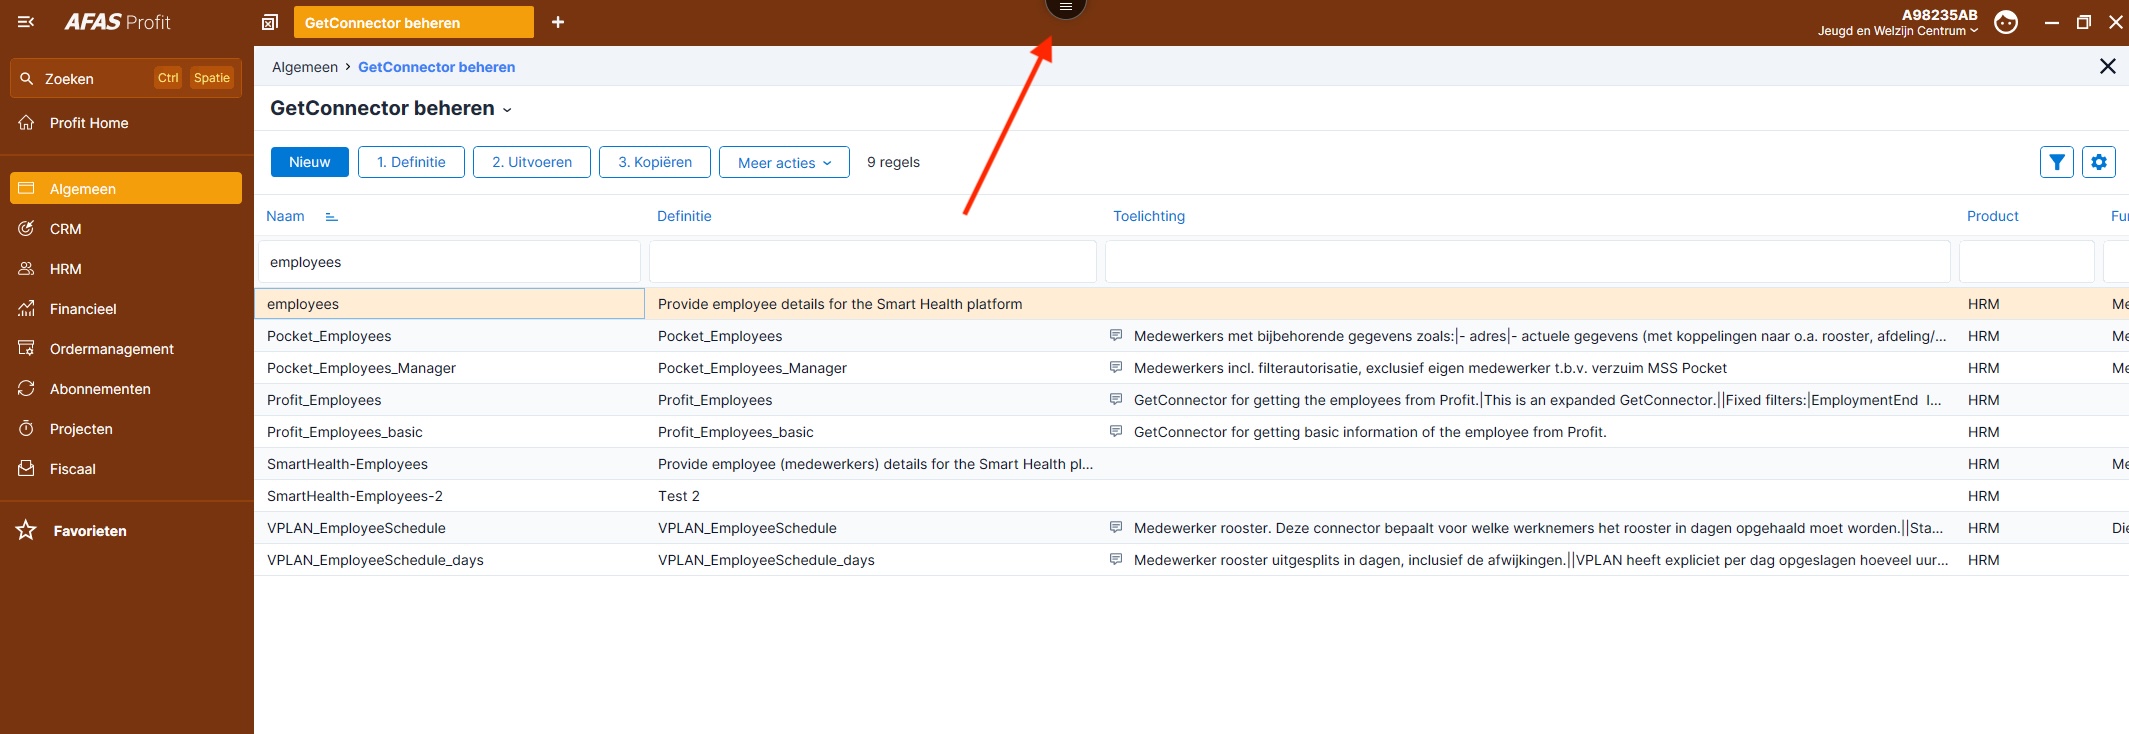
- Click "Algemeen" in the sidebar
- Under "Uitvoer", select "Beheer", then "GetConnector"
- Type in "smarthealth" in the input field under "Naam" and select your GET connector
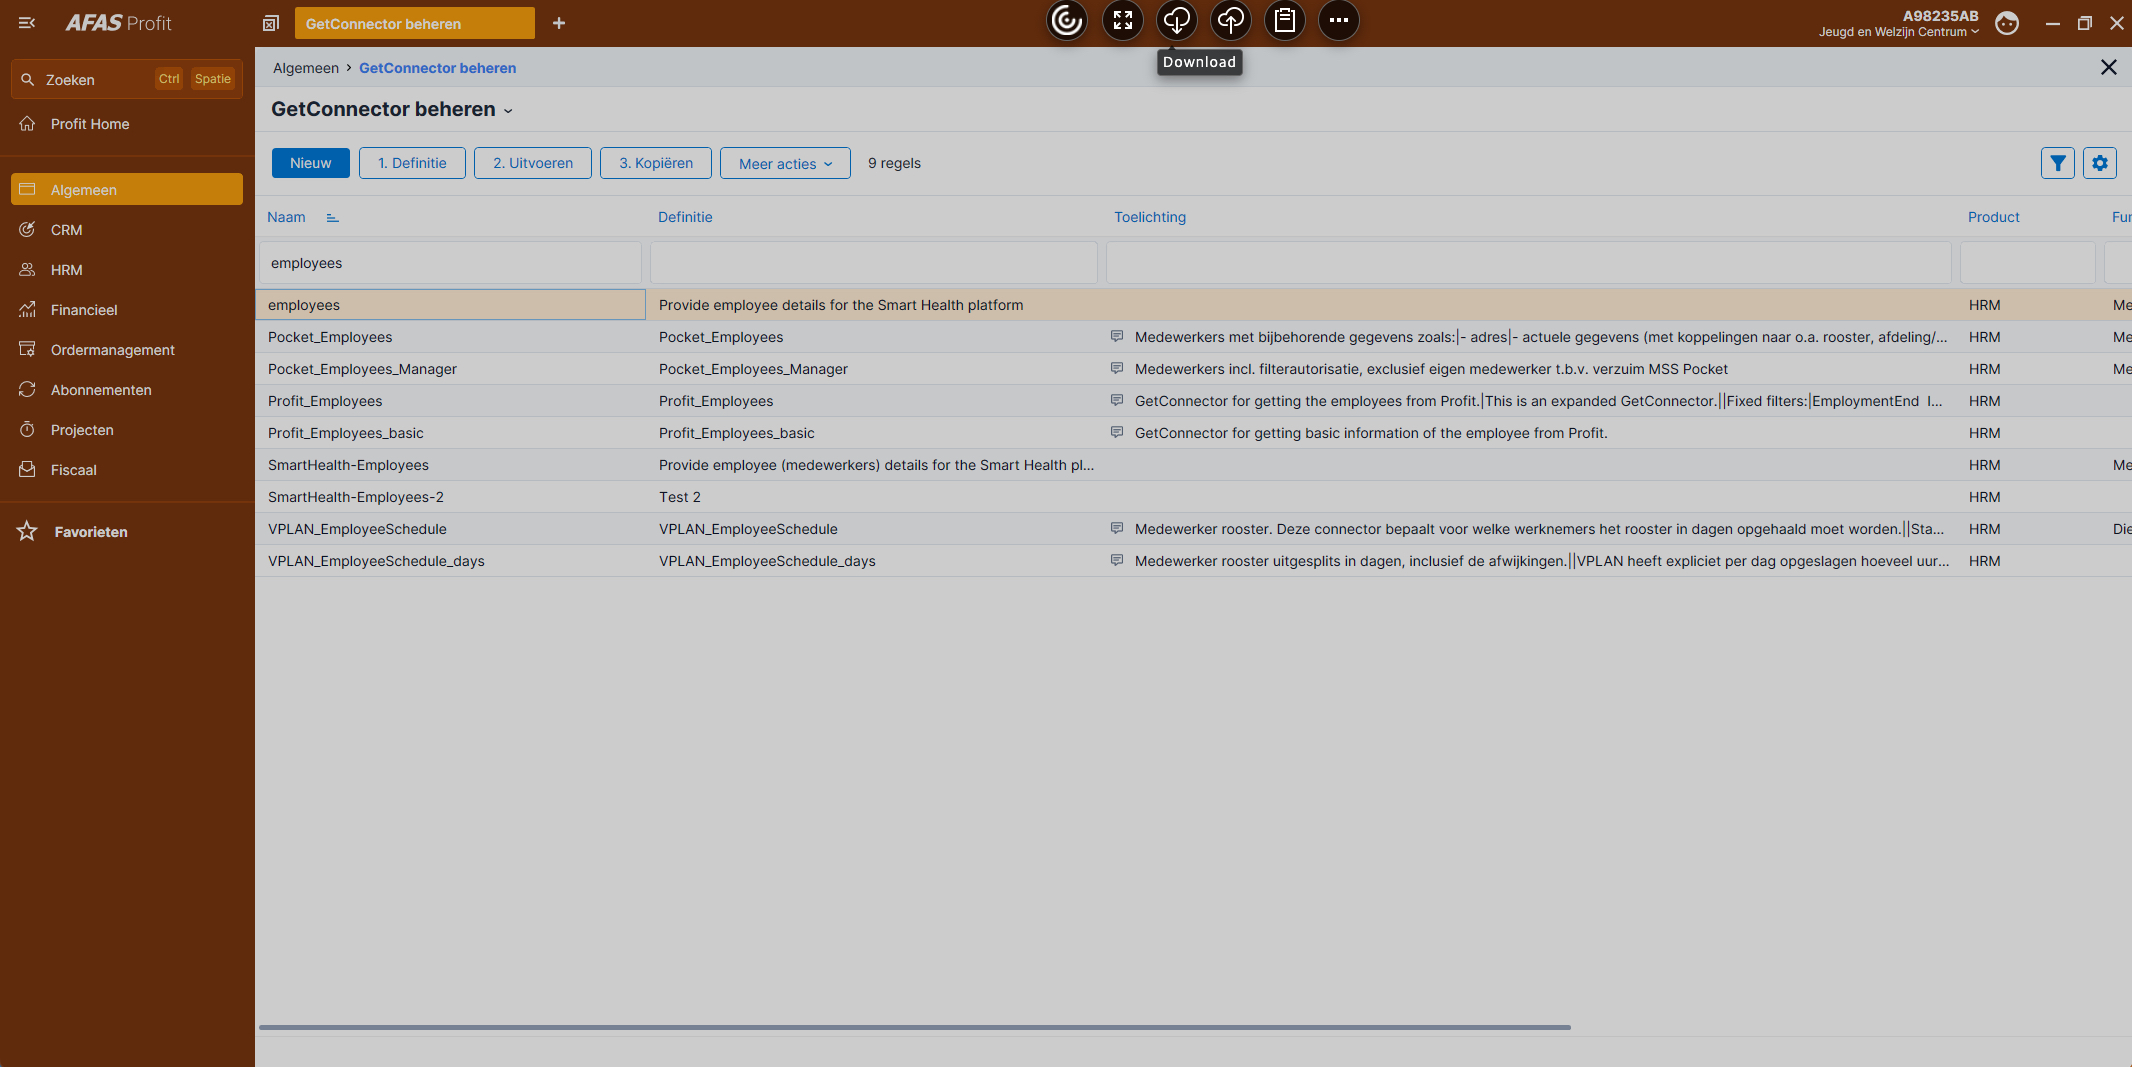
- Click the "Meer acties" dropdown menu and select "Exporteren"
- Click "Volgende" and the three dots
- Select the "AFAS_Temp (T:)" disk to save the file to and name it
smarthealth_employees_v1 - Click "Voltooien" twice
- Click the black half-rounded hamburger menu at the top of the page and click "Download"
- Navigate to the "AFAS_Temp (T:)" disk and double-click the "smarthealth_employees_v1.gcn" file
References:
Using a connector
TIP
The IntegrationId header is a requirement from AFAS to identify any requests coming from our platform. Adding a User-Agent doesn't hurt either.
GET https://CLIENTID.restaccept.afas.online/profitrestservices/connectors/smarthealth_employees_v1?take=5 HTTP/1.1
Content-Type: application/json
Accept: application/json
User-Agent: Smart Health - App - Local
Authorization: AfasToken base64encoded_app_connector_token
IntegrationId: 98235_217146
Connection: close
WARNING
Do not trust the response you get on https://connect.afas.nl/rest/get. The structure and contents can be different from what you get from a real API call!
De Zorggroep
The integration between De Zorggroep (SSO and hierarchy sync) and AFAS was implemented before Smart Health started the process of being a certified partner. In practice that means it doesn't use any of our connectors, but those of De Zorggroep. You can see an example of that API call in \Domain\Users\SingleSignOnProviders\DeZorggroepSingleSignOnProvider::getUserByToken().